Think about what happens at 9 PM on a November evening. Your beautifully constructed natural stone steps—the ones you invested $15,000 or $25,000 or $40,000 into—are completely invisible. Your guests walk out the back door into darkness. They cannot see the tread edge. They cannot see the riser height. They cannot see the ice that formed on the stone surface two hours ago. They guess where the step is. They miss. And now you are dealing with a twisted ankle, a fractured wrist, or worse—and your homeowner’s insurance company is asking why there was no illumination on a known elevation change on your property.
This is not hypothetical. Falls on exterior steps are among the most common residential injury claims in Ontario. The Ontario Building Code (OBC) mandates maximum riser heights, minimum tread depths, and consistent step geometry specifically to reduce fall risk. But even perfectly code-compliant steps become dangerous obstacles in the dark. The geometry is irrelevant if the person walking cannot see it.
Step lighting solves this completely. And when it is engineered correctly—integrated into the masonry structure, invisible during the day, and producing a warm, glare-free wash across each tread surface at night—it does not merely make your steps safe. It transforms them into the single most visually striking element of your nightscape.
The Liability of the Dark: Why Step Lighting Is Not Optional
Before the engineering details, the legal context matters. In Ontario, homeowners have a duty of care under the Occupiers’ Liability Act to take reasonable steps to ensure that visitors to their property are reasonably safe. An unlit exterior staircase at night on a property that entertains guests, receives deliveries, or is accessed by service personnel is a foreseeable hazard. If a guest falls on dark steps and is injured, the homeowner’s liability exposure is significant—especially if the property has no lighting infrastructure on the steps and the homeowner cannot demonstrate that reasonable precautions were taken.
In Toronto, where evening entertaining season extends from May through October and the sun sets as early as 4:43 PM by late December, exterior steps are used in darkness for the majority of the year. A Toronto homeowner with an unlit rear patio staircase, an unlit front walkway step-up, or an unlit garden terrace step-down is operating with a foreseeable hazard for approximately 10-14 hours per day during winter months. Step lighting is not an aesthetic luxury. On a legal and practical level, it is a baseline safety requirement.
The Engineering: Conduits, Cores, and Invisible Wiring
The difference between professional step lighting and amateur step lighting is simple: professional lighting is invisible. You see the light. You do not see the fixture housing. You do not see the wire. You do not see the conduit. You do not see the transformer. The light appears to emanate from the stone itself, as if the staircase were a self-illuminating architectural element.
Achieving this invisibility requires the lighting infrastructure to be installed inside the staircase structure, before the finish materials (stone treads, veneer, caps) are applied. Once the treads are set and the veneer is adhered, the interior of the staircase is permanently sealed. Any wiring that was not already routed through the structure is now locked out.
Step Construction Anatomy
A professionally constructed outdoor staircase in Toronto typically consists of:
- Compacted granular sub-base (150-300mm of Granular A, mechanically compacted to 98% Standard Proctor density) beneath the entire staircase footprint
- Reinforced concrete footing (200mm minimum thickness, 32 MPa, steel reinforced) poured on the compacted sub-base as the structural foundation for the stair structure
- Concrete masonry unit (CMU) blockwork (200mm/8-inch standard blocks) stacked on the footing to create the riser walls and interior core structure. The blocks are reinforced with vertical rebar in critical cores and grouted solid in load-bearing positions
- Natural stone or precast concrete treads (typically 50-75mm thick slabs) set on a mortar bed on top of the CMU structure
- Natural stone or manufactured veneer applied to the exposed riser faces and cheek walls (the side walls of the staircase)
The critical detail: the CMU blocks have hollow cores. These cores are the wire chases. Low-voltage wiring is routed vertically and horizontally through these cores, from the sub-base conduit at the bottom of the staircase to the fixture locations at each riser, before the treads are set and the veneer is applied.
Sub-Base Conduit (The Underground Feed)
A 20mm or 25mm Schedule 40 PVC conduit is buried in the granular sub-base during Phase 1 earthwork, running from the lighting transformer location (typically at the house wall or inside a nearby landscape feature) to the base of the staircase foundation. The conduit enters the staircase footing through a pre-cast sleeve and stubs up inside the first CMU block at the bottom of the staircase.
On Toronto properties, where the typical landscape lighting system serves multiple features (steps, retaining walls, pathway lights, patio perimeter, and garden bed accent lighting), the step lighting conduit often branches from a main trunk conduit that runs the length of the property. This trunk line connects all lighting zones back to a single smart transformer, allowing the entire property lighting system to be controlled, dimmed, and scheduled from one device.
Core Wire Routing (Inside the Blockwork)
From the sub-base conduit stub-up, low-voltage wire (typically 12-gauge or 14-gauge, depending on the run length and total load) is pulled vertically through the hollow CMU cores to the height of each riser where a fixture is installed. At each fixture location, the wire exits the core through a drilled port in the block face (or through a mortar joint between blocks) into the fixture recess.
The wire routing plan is documented in the staircase construction drawings. It specifies:
- Which cores carry wire (clearly marked so the mason does not grout these cores solid)
- Where horizontal crossovers occur between adjacent cores (using 90-degree sweep elbows between block courses to prevent sharp bends that damage wire insulation)
- Where the wire exits at each riser for the fixture connection
- Which circuit (home run) feeds which group of risers, allowing zone control of individual step sections
This routing must be completed before the stone treads are set. Once the treads are mortared onto the CMU structure, the cores are capped and inaccessible. Any wire not already in position is permanently excluded. This timing requirement is the single most critical coordination point in hardscape step lighting, and it is the reason that step lighting must be designed at the blueprint stage, not added as an afterthought after construction is complete.
“If the wire is not inside the block before the stone goes on top, it will never be inside the block. There is no second chance with masonry step lighting. The window is open once, and it closes permanently.”
The Under-Tread Wash: Illuminating the Aesthetic
With the wiring infrastructure invisible inside the blockwork, the visible element—the light itself—is about restraint, precision, and warmth.
What to Avoid: The Runway Effect
The most common amateur step lighting mistake is installing surface-mounted, forward-facing puck lights centred on each riser face. These fixtures project a bright cone of light directly toward the person descending the stairs. The effect is blinding glare—the person sees the light source, not the step. Their pupils constrict in response to the bright point source, reducing their ability to see the tread surface and step edge. The “safety lighting” actually makes the steps less safe because it destroys the walker’s night vision and creates harsh shadow zones between fixtures.
This is the runway effect: a row of bright dots that looks like an airport taxiway rather than a residential staircase. It communicates “we added lights later” rather than “this staircase was designed to be beautiful at night.”
The Professional Approach: Under-Tread Wash
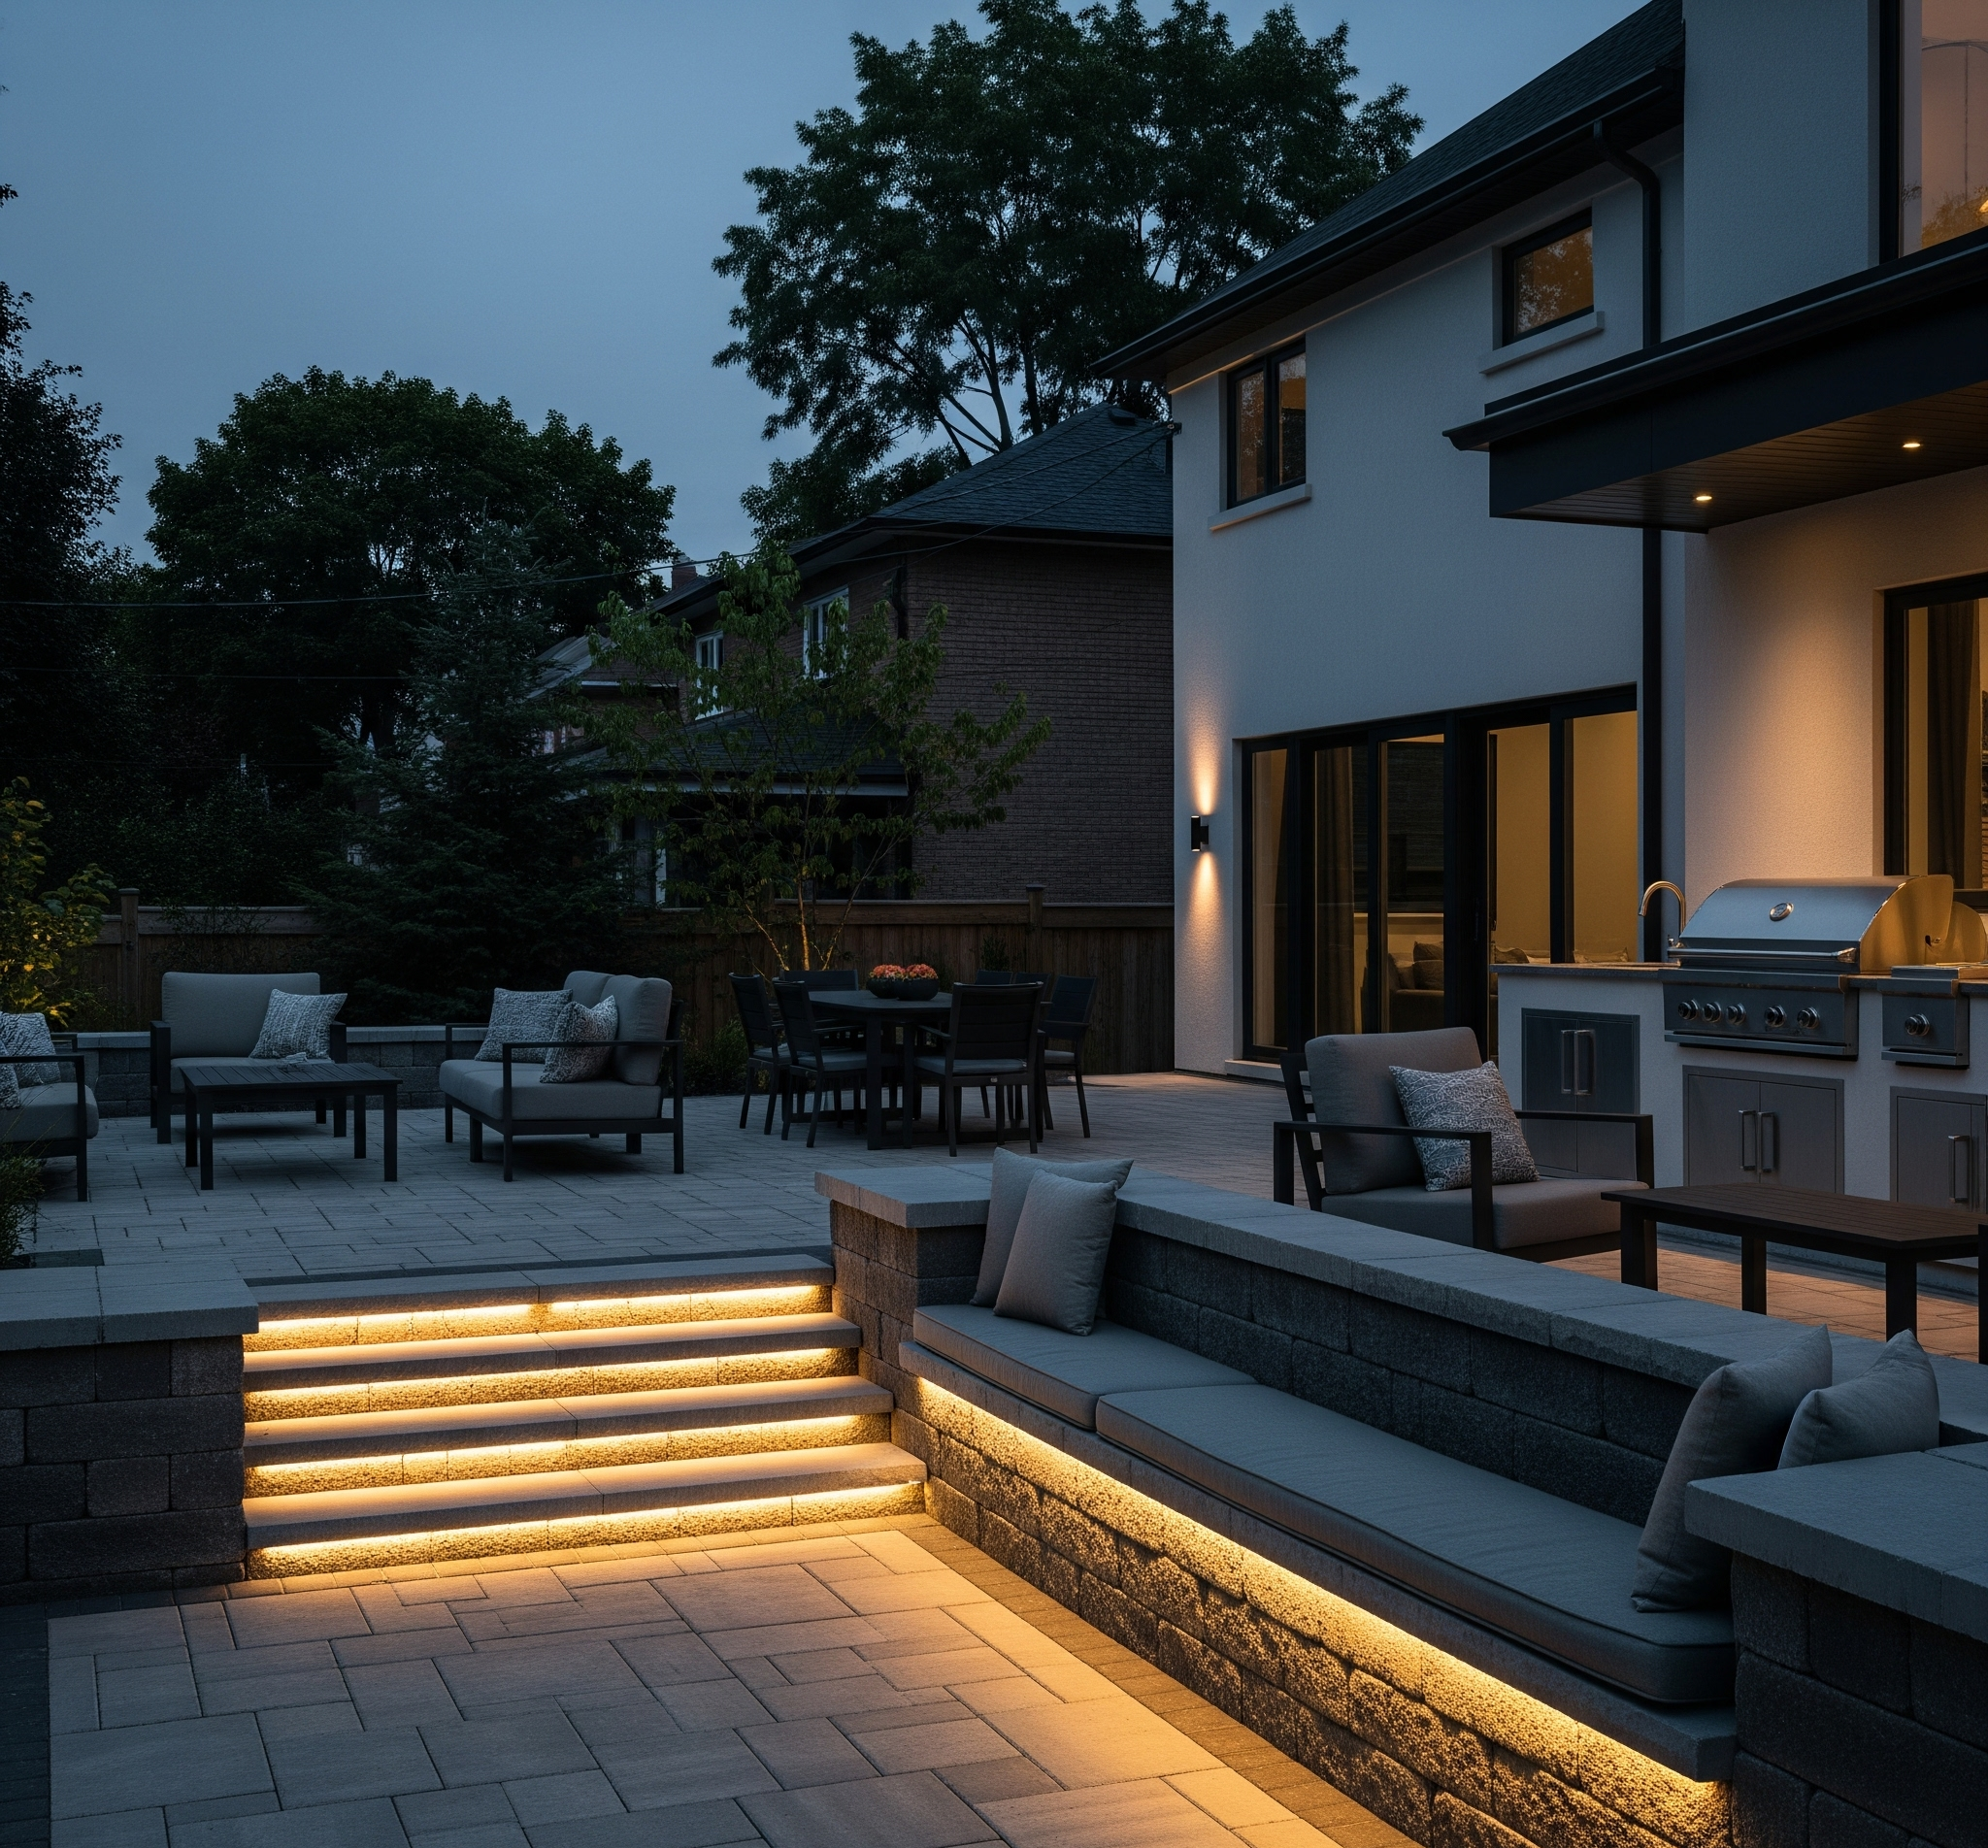
Professional step lighting uses a completely different technique: a continuous LED strip light (or a series of closely spaced miniature linear fixtures) mounted underneath the nosing (front overhang) of each stone tread. The fixture is recessed into the shadow gap between the underside of the tread and the top of the riser face below. The light washes downward and outward, illuminating the tread surface of the step below while the fixture itself remains completely hidden from the view of anyone standing at normal height.
The visual effect is transformative. Each stone tread appears to float above a band of warm light. The massive, heavy masonry staircase—built from reinforced concrete, CMU block, and 75mm natural stone slabs weighing hundreds of kilograms—appears to levitate in the darkness, each step hovering above a luminous plane. The deep Charcoal stone riser recedes into shadow while the warm Off-White tread surface above it glows under the amber wash. The tonal contrast between the illuminated Off-White tread and the dark Charcoal riser is amplified by the light, creating more visual definition at night than the steps have during the day.
Specification for Under-Tread Step Lighting
- Colour temperature: 2700K (Warm White). This is the warmth of candlelight and firelight—the colour that the human nervous system associates with comfort and safety. On Warm Off-White natural stone treads (Ivory, Champagne, Sandstone), 2700K light produces a rich, golden-amber glow that makes the stone look warm, organic, and expensive. Cool-white light (4000K+) on the same stone makes it look grey, clinical, and institutional. On Deep Charcoal risers, 2700K warm light picks up subtle brown and bronze undertones in the stone that are invisible in daylight, adding depth and richness to the riser face. The colour temperature is the single most impactful specification in step lighting—get it wrong and the entire staircase looks cheap regardless of the fixture quality
- CRI (Colour Rendering Index): Minimum 90+. High CRI ensures that the natural colour variation in the stone—the veining, the mineral inclusions, the subtle tonal shifts from slab to slab—is rendered accurately under artificial light. Low CRI fixtures wash out these variations and make expensive natural stone look like painted concrete
- Output: 200-400 lumens per linear metre. Step lighting is low-output illumination. The goal is to reveal the tread edge and surface texture, not to flood the staircase with stadium brightness. Over-bright step lights create harsh shadows, cause glare at ground level, and overpower the surrounding landscape lighting. The most beautiful step lighting is subtle—enough to see every tread edge clearly, not enough to read a book by
- Fixture type: Aluminium-extrusion LED channel with frosted diffuser lens. The aluminium channel serves as a heat sink (critical for LED longevity in the confined space beneath a stone tread), a rigid mounting substrate, and a housing for the frosted diffuser lens. The frosted diffuser eliminates the visible “dot pattern” of individual LED chips, producing a smooth, continuous wash of light rather than a row of bright points. Bare LED strips without a diffuser channel look cheap and produce harsh, uneven light—unacceptable on a luxury staircase
- IP rating: IP67 minimum. Step lighting fixtures are mounted at ground level in a semi-enclosed space that collects rainwater, snowmelt, debris, and ice. In Toronto, where winter temperatures routinely fall to -15°C to -25°C and freeze-thaw cycling occurs dozens of times per season, the fixture must be impervious to water intrusion and rated for sub-zero operation. IP67 (protected against temporary immersion) is the minimum acceptable rating. Fixtures with IP65 or lower ratings fail within 2-3 seasons as moisture infiltrates the lens seals and corrodes the LED contacts
- Mounting position: Recessed under the tread nosing, 10-15mm behind the tread front edge. The fixture must be completely invisible from any normal viewing angle—standing at the top of the stairs looking down, standing at the bottom looking up, and approaching from the side. The tread overhang (typically 25-40mm on a properly detailed stone staircase) provides the natural concealment. If the fixture is visible from any angle, the installation has failed
Alternative: Riser-Face Recessed Fixtures
A second professional approach uses small, flush-mounted LED puck fixtures (typically 40-60mm diameter) recessed directly into the riser face stone. Circular or rectangular cutouts are diamond-cored into the riser veneer at precise locations (typically one fixture centred on the riser, or two fixtures positioned at the one-third points for wider stairs), and the fixtures are set flush with the stone surface.
The riser-face approach produces a different aesthetic than the under-tread wash. Instead of a continuous band of light across the full tread width, each fixture projects a semi-circular pool of light on the tread below, creating a scalloped pattern of overlapping light zones. This pattern can be beautiful on wide, formal staircases (1.5m+ width) where the scallop repetition creates a rhythmic visual pattern. On narrow stairs (under 1.2m), the scallop pattern can feel busy and cluttered. The under-tread continuous wash is generally the cleaner, more minimal solution for typical residential step widths.
On Toronto properties with Deep Charcoal natural stone risers, recessed puck fixtures in the dark stone are nearly invisible during the day—the dark fixture face disappears against the dark stone. On lighter riser stones, the fixture face is more visible and can disrupt the clean monolithic appearance of the riser surface.
The Cheek Wall and Flanking Approach
For staircases with flanking cheek walls (the solid masonry side walls that run along the staircase edges), an additional lighting layer can be integrated into the wall structure. Under-cap wash lights mounted beneath the wall cap (the coping stone on top of the cheek wall) wash warm 2700K light down the interior face of the cheek wall, illuminating the wall texture and casting indirect light onto the adjacent treads.
This cheek wall wash lighting serves a dual purpose: supplementary step illumination and visual integration of the staircase lighting with the broader retaining wall and landscape lighting system. When the retaining walls flanking the staircase use the same under-cap wash technique as the retaining walls elsewhere on the property (at the patio perimeter, along the driveway, around the garden terraces), the staircase visually connects to the surrounding landscape lighting rather than reading as an isolated, independently lit feature.
The Transformer and Control System
All step lighting fixtures connect to a central low-voltage transformer (12V or 24V) that powers the entire landscape lighting system. The transformer should be:
- Sized with 20% headroom beyond the total connected fixture wattage, preventing thermal stress and providing capacity for future fixture additions
- Multi-tap output (12V, 13V, 14V, 15V) to compensate for voltage drop on longer wire runs. On a typical Toronto property where the transformer is mounted at the house wall and the farthest step fixtures are 15-25 metres away, the step circuit is connected to the 13V or 14V tap to deliver a full 12V to the fixtures after line loss
- Smart-enabled with Wi-Fi or Bluetooth control, allowing the homeowner to set dusk-to-dawn scheduling, seasonal timer programs, and independent zone dimming from a smartphone app. The step lighting zone can operate on a separate dimming circuit from the patio ambient lighting, the garden accent lighting, and the driveway pathway lighting—each zone independently adjustable
- Concealed and accessible—mounted inside a weatherproof enclosure at the house wall or inside a dedicated landscape utility box, accessible for maintenance without removing any hardscape material
For Toronto properties with an outdoor kitchen and a multi-zone patio in addition to the illuminated steps, the step lighting should be integrated into the broader smart transformer system rather than powered by a separate, standalone transformer. A single multi-zone transformer (300W-900W, depending on the total fixture count) provides unified control, consistent dimming behaviour, and simplified maintenance across the entire property lighting system.
“Step lighting is the safety layer that happens to be the most beautiful lighting on the property. When the rest of the landscape is dark, the floating staircase is the first thing the eye finds.”
Seasonal Performance in Toronto Climate
Step lighting in Toronto must survive the full spectrum of Ontario weather: +35°C humid summer heat, -25°C dry winter cold, 50+ freeze-thaw cycles per season, heavy rain, standing snow, ice accumulation, and road salt exposure on front walkway steps.
Winter Considerations
- Snow accumulation: Under-tread fixtures are partially protected by the tread overhang, but snow windblown into the shadow gap beneath the tread will pack against the fixture face. IP67-rated fixtures are designed for this—the sealed housing prevents moisture intrusion even when submerged in snowmelt for extended periods during spring thaw
- Ice formation: If water pools on the tread surface and freezes, it can extend into the shadow gap and encase the fixture in ice. Low-voltage LED fixtures operate at low temperatures and do not generate sufficient heat to melt ice. However, the fixture lens and housing materials must be rated for sub-zero thermal cycling without cracking. Polycarbonate lenses outperform glass lenses in freeze-thaw environments because polycarbonate flexes microscopically with thermal expansion rather than fracturing
- Salt exposure: Front walkway steps that are de-iced with road salt or calcium chloride expose the step lighting fixtures to highly corrosive chloride solutions. Fixture housings must be 316 stainless steel or marine-grade anodised aluminium—not 304 stainless, which pits and corrodes in chloride environments within 2-3 seasons. For properties in Toronto neighbourhoods near major arterial roads (Lawrence Avenue, Sheppard Avenue, Eglinton Avenue, Kingston Road), windblown road salt spray can affect even rear-yard fixtures
Summer Considerations
- UV exposure: LED fixtures exposed to direct summer sunlight can experience lens yellowing if the lens material is not UV-stabilised. UV-stabilised polycarbonate and tempered glass lenses maintain optical clarity for 10+ years. Non-stabilised acrylic lenses yellow within 2-3 seasons, reducing light output and producing a visibly degraded appearance
- Heat: Stone treads absorb significant solar heat during summer days. Under-tread fixtures can be exposed to contact temperatures of 50-60°C on south-facing steps in direct afternoon sun. LED modules rated for outdoor service are designed for operating temperatures up to 60°C, but budget indoor-rated LEDs (rated to 40°C) will experience accelerated lumen depreciation and premature failure in this environment
The Cinintiriks Approach: Invisible Infrastructure, Visible Safety
At Cinintiriks, step lighting is not an add-on. It is not an upgrade. It is a standard component of every staircase we build. We do not construct a staircase and then ask the homeowner if they want lighting. We design the lighting into the staircase from the first drawing, route the wires through the cores during construction, and install the fixtures before the treads are set. Every staircase we build in Toronto is illuminated. No exceptions.
The Cinintiriks Standard: Integrated Step Lighting
1. Lighting Designed at Blueprint Stage: Every staircase lighting plan is produced during the design phase, before excavation begins. The plan specifies fixture type, fixture location on each riser, colour temperature, wire gauge, core routing paths, conduit locations, and transformer circuit assignment. The mason, the electrician, and the stone installer all work from the same coordinated drawing set.
2. Sub-Base Conduit Pre-Installed During Earthwork: The low-voltage power feed is run in Schedule 40 PVC conduit buried beneath the granular sub-base during Phase 1 excavation, connecting the transformer to the staircase footing through a pre-cast sleeve. By the time the first CMU block is laid, the wire pathway from the transformer to the staircase is already in place and permanently buried.
3. Wire Pulls Through CMU Cores Before Treads: Low-voltage wiring is pulled through designated hollow CMU cores and exits at each riser fixture location before the stone treads are set. Cores carrying wire are clearly marked on the construction drawings and are never grouted solid. Once the wires are in position and tested, the treads are set. The wiring is sealed inside the structure permanently. Zero exposed wires. Zero surface-mounted conduit.
4. Under-Tread Aluminium Channel with Frosted Diffuser: Every step lighting fixture is housed in an extruded aluminium channel with a frosted polycarbonate diffuser lens, mechanically fastened to the underside of the tread nosing. The channel provides heat dissipation, rigid mounting, and a smooth, continuous light wash with no visible LED dot pattern. The fixture is invisible from all normal viewing angles.
5. 2700K Warm-White, CRI 90+ Throughout: Every step lighting fixture on a Cinintiriks staircase is specified at 2700K colour temperature with a minimum CRI of 90. This temperature matches the ambient lighting used on retaining walls, patios, and landscape features across the property, ensuring a unified warm-white tone with no colour temperature mismatch between the steps and the surrounding lighting system.
6. IP67, Marine-Grade, Toronto-Winter-Rated: Every fixture is IP67 rated with 316 stainless steel or marine-grade anodised aluminium housings and UV-stabilised polycarbonate diffuser lenses. LED modules are rated for 50,000+ hours of operation (14+ years at 10 hours per day) and operating temperatures from -40°C to +60°C. These fixtures are engineered for permanent outdoor exposure in Toronto’s full climate range—no seasonal removal, no winter storage, no replacement cycles.
Don’t compromise your family’s safety with dark, dangerous stairs. Contact Cinintiriks for a heavily engineered, fully illuminated hardscaping solution in Toronto.
FAQ: Outdoor Step Lighting
Can I cleanly install hardscape lighting under my steps if the stairs are already built?
It depends on the staircase construction, but in most cases the result will be a compromise rather than a truly integrated installation. If the stairs are CMU block construction with stone treads mortared on top, the hollow cores are sealed and inaccessible. You cannot route wires through the cores without removing the treads (which typically destroys the mortar bond and risks cracking the stone) or cutting access ports in the veneer face (which leaves visible repair patches). The practical alternative for already-built stairs is a surface-mounted approach: LED strip fixtures in aluminium channels are adhesive-mounted or mechanically fastened to the underside of the tread overhang, with low-voltage wire routed along the exterior of the cheek wall (behind a removable trim channel or along a mortar joint chase cut with a diamond grinder). This approach can produce acceptable lighting, but the wire routing is never as clean as an internally routed system. Surface-mounted wires, even when concealed in painted conduit channels, are visible on close inspection and vulnerable to UV degradation, physical damage, and freeze-thaw cycling. The cost of retrofitting lighting on existing stairs is typically 40-60% of the cost of integrated lighting during original construction, while producing a visually inferior result. If you are planning a new staircase, or if your existing stairs need reconstruction for other reasons (settlement, cracking, riser height non-compliance), the most cost-effective approach is to include integrated lighting in the new build from the start.
What is the safest color temperature (Kelvin) for outdoor stair lighting?
2700K (Warm White) is the optimal balance of safety, comfort, and aesthetics for residential step lighting. From a pure safety perspective, higher colour temperatures (4000K-5000K, Cool White to Daylight) provide slightly higher scotopic visibility—the ability to perceive contrast and edges in low-light conditions—because the blue-shifted spectrum more effectively stimulates the rod cells in the human retina that are responsible for peripheral and low-light vision. However, the difference in scotopic visibility between 2700K and 4000K is marginal at the light levels used in residential step lighting (200-400 lumens per metre). At these modest output levels, the tread edge and surface texture are clearly visible at 2700K. The safety benefit of the higher Kelvin temperature is negligible, while the aesthetic penalty is severe: 4000K-5000K light makes natural stone look grey, cold, and institutional. It clashes visually with the warm ambient tones (firelight, warm-white landscape lighting) that dominate a luxury evening outdoor environment. And it produces a harsher, more glaring quality that is uncomfortable at close range. 2700K provides safe, clear step edge visibility while maintaining the warm, luxurious aesthetic that a premium hardscape investment deserves. Every luxury resort, boutique hotel, and high-end restaurant uses 2700K for exterior step lighting for exactly this reason.
Are low-voltage LED step lights safe to operate in the snow and heavy rain?
Yes—provided the fixtures are properly rated for permanent outdoor exposure. Low-voltage LED step lighting operates at 12V DC, which is inherently safe. Unlike 120V household current, 12V DC cannot deliver a harmful electrical shock even in direct water contact. This is why low-voltage landscape lighting does not require GFCI protection under the Ontario Electrical Safety Code—the voltage is too low to present a shock hazard. The concern with water exposure is not electrical safety but fixture longevity. Fixtures must be rated IP67 (protected against temporary immersion in water up to 1m depth for 30 minutes) to survive the conditions at step level in a Toronto winter: standing snowmelt, pooled rainwater, ice encasement, and chloride salt solution from de-icing agents. The fixture housing must be 316 stainless steel or marine-grade anodised aluminium—materials that resist chloride corrosion. The lens must be UV-stabilised polycarbonate that maintains optical clarity after years of sun exposure without yellowing or cracking. The LED module must be rated for -40°C to +60°C operating temperature to handle the full range of Toronto’s seasonal temperature swing. Budget fixtures with IP65 ratings, 304 stainless steel housings, and non-stabilised acrylic lenses cost 40-60% less initially but typically require replacement every 2-3 seasons, making them more expensive over any 10-year horizon than properly specified professional fixtures that last 15+ years with zero maintenance.
The Final Word
A luxury stone staircase without integrated lighting is a half-finished staircase. It is beautiful for twelve hours a day and dangerous for the other twelve. The engineering is invisible—buried in conduits, routed through hollow cores, sealed behind stone treads and veneer faces. The effect is extraordinary—floating stone treads, warm amber wash, tread edges defined with precision, and a nightscape that makes the staircase the most compelling architectural element on the property.
The window for integrating that engineering is narrow. It opens when the CMU cores are accessible and closes permanently when the treads go down. Miss that window, and you are left with surface-mounted compromises, exposed wire channels, and the knowledge that the staircase could have been exceptional instead of adequate.
That is The Cinintiriks Standard. Not illuminated as an afterthought. Engineered to glow from within.